Second Step: Check Video Format -- Convert Video into FLVLike other software, the input video files only accept FLV format so as to enable output video player to playback clips. If your video clips are different formats, you need to convert them to FLV format first. There is a simple tutorial on its website of converting video files of different formats such as MOV, WMV, FLV, MPEG-4, MPG, RM, RMVB, AVI, VOB, ASF, DV, 3GP, M1V and M2V into FLV format. Here is the link:
http://www.web-video-player.com/videoconverter.php  Third Step: Add Videos to Player
Go to "(1) Video" and click the button "Add" to add flash video (flv) files.
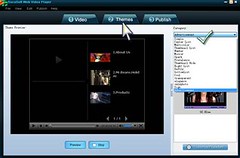
 Fourth Step: Choose Themes for Player
Go to "Themes" and choose the template of web player for your video clips. There are lots of cool templates. Get one as you like or that matches the style of your website or blog. The program allows you to customize web player in advanced mode. Click to button "Customize Parameters" at the bottom right corner to find out more.
 Fifth Step: Advertising Function (For registered users) -- Add advertisement and link to video and player
Some people may want to add advertisements and links to video and player, which is considered as another strategy in product advertising and website promotion. Well, Socusoft Web Video Player has such advertising function with advanced templates but only for registered users. That is, you need to buy the program and then use the license name and code to register it so as to enjoy full function.
1) Prepare advertisement image
The format of the ad image can be jpeg, gif, jpg, png and swf. If you want to add an advertisement image with no target link on it, the format of the image can be jpeg, gif, jpg and png. If you want to add a target link to a web page for the advertisement image, the format must be swf. You may use Flash Slideshow Maker, Macromedia Flash, SnagIt or other tools to add URL easily to the image and save it as swf format.
 2) Choose advertising templates
Go to "Themes" and choose the template of web player for your video clips such as the template "Advertisement".

3) Add image to player
Now go to the advanced mode. Click button "Customize Parameters" at the bottom right corner. Then, Click the blank field of Advertisement and get the advertising image.

Sample:
 4) Add link to video
If you need to add target links to videos, go back to "(1) Video" and choose videos that you need to add target URL to. Then, click the button "Edit". There will be a pop-up dialogue. Go to "Target URL" and input the link such as company website. Please remember to add "http://" first.
 Sixth Step: Publish Video and Player
When finished the above steps, go to the sixth step "Publish". Click the button "Publish Now" to integrate your video with player. Your video has right now been embedded a cool player. You may click "View Web Page" to preview your web video.
 Last Step: Upload Files – Publish web video to your website or blog1) Publish video to your website
Click "Open Output Folder" and use upload tools such as CuteFTP to upload all of the files in the folder of "output" to your web space. You may create a new folder on your web space first such as "video" for the output files. If the created folder is in the root directory, the URL of your web video should be:
http://www.*****.com/video/***(name of the published html file).html
2) Add web video to your blog or forum and more
You may also add your published web videos to your blog or forum and more. Here is an example of adding videos to google blog.
Click "Open Output Folder". Then, open the html file with FrontPage, Dreamweaver or Notepad. The html file is the same with the one uploaded.

Right here, I use Notepad to open the above-mentioned html file and switch to the code mode and change the paths like the following screenshot. Please note that you need to input your website URL instead of " *****.com" as shown below.

After that, copy the code between "object" as above. Go to your google blog and paste the code as shown below. After that, publish the post. You may now view your web video on google blog.

Some blogs may not support HTML well. If so, you may also use the following code, which is simple. That is, "iframe" plus "the path".